SUMMARY: Many older adults (OAs) are unaware of the Physical Activity Guidelines for Americans (Guidelines)…

STAND AND MOVE BETTER: THE 7-POINT ALIGNMENT EXERCISE
Last post I talked about the need to stand more and sit less. This post let’s talk about a simple exercise which helps create better organization of your body when you stand and also serves as an important foundation for functional movement skills.
POSTURE AND ALIGNMENT
Sitting turns postural muscles off – they basically fall asleep and, over time, lose the ability to hold our body in an optimal position. The sitting position also creates an adaptive shortening of our muscles, fascia and joint capsules which is made worse by constantly staring down at personal electronic devices. Shortened and stiff tissues need to be re-set back into proper position by mobilization – a general term including several techniques for loosening/moving joints and tissues into a better position.
How we organize our body against gravity is called posture or alignment. Good standing posture involves the vertical stacking of our body parts one on top of another. This requires the active engagement of our muscles to generate low force for long periods of time. Because postural control is a 24/7 activity, it’s not practical or advisable to think about or consciously engage postural muscles – it has to be automatic and reflexive. If you’re over 50, you’ve accumulated a lot of sitting time, so could probably benefit from strategies which improve the automatic engagement of your postural muscles – and that’s where the 7-Point Alignment Exercise fits in.
A SIMPLE STRATEGY TO IMPROVE STANDING POSTURAL ORGANIZATION
The 7-Point Alignment Exercise is performed with your back against a wall. The “7 points” of the exercise represent the 7 body parts you activate and align for a gentle postural mobilization and facilitation. The muscular force you generate will be low – the exercise should be quite gentle with no straining or breath holding. Below I describe the “7 Points” from the feet/ankles and move up the body to the head/neck.
You want to develop the ability to simultaneously engage all of the “7 Points” of muscle actions, but initially just focus on one or two points until you are comfortable creating the desired gentle activation. Then practice engaging the next point until you can hold all 7 together for at least 10 seconds. Start with 10 second holds and gradually add time to at least 30 seconds. For maximum effectiveness, plan to work up to several repetitions of at least 30 seconds each time you practice this drill – and practice it often – if you need motivation think of how much time you spend sitting compared to the relatively small amount of time you might practice this exercise.
Please note, again, the idea is not that you should consciously think about or perform each of these actions when standing in daily life. The intention is that over time tissues will move, postural muscles will wake up, and you will create better standing alignment reflexively, without having to think about it.
IMPORTANT FOUNDATION AND VALUE ADDED
You might think this exercise doesn’t look like much, but it’s sneakily important because the muscular actions created serve as an important foundation for more advanced movement skills and body positions like changing levels (moving up and down) and single leg standing balance. By mastering this exercise you will improve your posture and set yourself up to improve and enhance other functional movement skills.
When you are comfortable with this exercise, a bonus is you can practice the active engagement of points 4 through 7 when you are stuck in a seated position, like in your car stopped at a red light. For your posture (and safety for that matter), it’s a much better option than checking your phone! For Point 6, skip any arm action and just focus on pulling your shoulder blades together toward your spine.
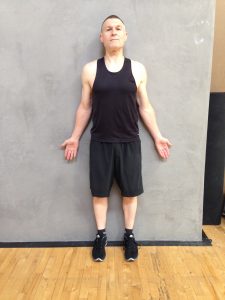
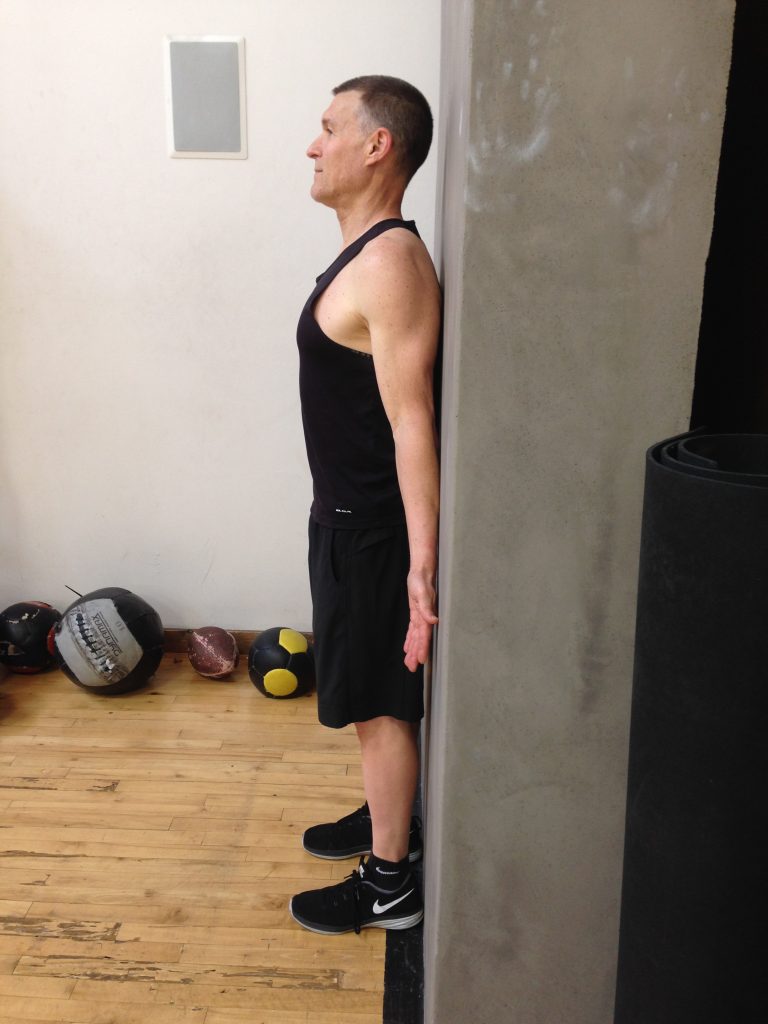
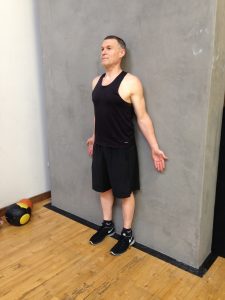
7-POINT ALIGNMENT EXERCISE
I’ve included three photos of the 7-Point Alignment body position with a front, side and oblique view
Starting Position: Position your back against a wall with your feet straight ahead (perpendicular to wall) hip width apart and your heels, bottom and the back of your shoulder blades (scapulas) touching the wall.
Point 1 Action: Screw your feet into the ground by lightly applying a rotational force – left foot counterclockwise, right foot clockwise – and slightly push your knees apart laterally. Note your feet shouldn’t actually turn or move in relation to the floor, but that’s the force you’re trying to create and you will notice your arch raising.
Point 2 Action: Lift your knee caps (patellas) up slightly by lightly contracting the muscles in the front of your thighs (quads).
Point 3 Action: Firm up your bottom by lightly squeezing your cheeks together – there should be no movement of your pelvis – meaning your low back should not flatten out and move closer to the wall.
Point 4 Action: Gently firm up your tummy – this is called “bracing” and should not be confused with drawing your mid-section in toward your spine. We want you to create some light firmness by contracting your abdominal muscles, so initially check for firmness with your fingers. If you find you are drawing in your mid-section, that’s OK, but bracing would be better for its applications to movement mechanics, lifting, carrying and changing levels.
Point 5 Action: Gently lift your chest toward the ceiling – imagine a string attached to your breast bone (sternum) with someone pulling the string toward the ceiling.
Point 6 Action: With your arms at your sides, turn your thumbs away from your body so your palms face forward and your forearms, top of your wrists, knuckles and thumbs are lightly touching the wall – now think about slightly pulling your shoulder blades together toward your spine (scapular retraction).
Point 7 Action: With the underside of your chin parallel to the floor (neither tipped up nor down), lightly pull your chin straight back toward the wall – this should be a very gentle and small action as we are just trying to eliminate any chin-forward position. Your head and chin should remain level with the ground and the back of your head should not touch the wall.
Related Posts