SUMMARY: VILPA stands for Vigorous Intermittent Lifestyle Physical Activity, which is defined as “brief bouts…

GROOVE YOUR HIP HINGE PATTERN PART 2: FIXES/PROGRESSION
Last post I suggested over-50 adults and seniors should start fitness development by improving fundamental movement and body control skills. I outlined how joint and tissue sparing movements involve loading the hips first because they are designed to carry the load. I introduced the Wall Hip Hinge Pattern (WHHP) as a simple way to groove the primary hip hinge pattern. This post I’ll cover a) strategies to fix common movement errors of the WHHP and, if you’ve perfected your technique with the basic WHHP, b) a method to progress.
The performance objective of the WHHP is to express primary hip dominance by hinging your hips back to lightly touch a wall and return to standing without your knees moving forward. If your knees do move forward, we need to correct that error first and foremost, and that correction is below.
Sometimes people can get the wrong idea: it’s not as if your knees will never move forward with lower body movements – they often will. The issue is which is loaded first with movement, hips or knees? Many aging adults express a pattern of knee loading before hip loading which creates unstable and inefficient movement and excessive wear and tear on joints and tissues. For a visual comparison of “knee dominance” and “hip dominance” see the headline photo above and my discussion in the HIP DOMINANCE section of my last post.
PRIMARY ERROR 1: NOT MASTERING THE 7-POINT ALIGNMENT EXERCISE
Mastering the 7-Point Alignment Exercise (an earlier post) will improve every aspect of your WHHP! The 7-Point Alignment Exercise is a very important basic foundation for the posture, alignment and stability of all functional movements, so you can never practice it too much.
PRIMARY ERROR 2: STARTING TOO FAR AWAY FROM THE WALL
The most common error I see is starting with your heels too far away from the wall. If in doubt, always start with your heels closer to the wall than you think you should! This one adjustment will often improve or even correct the other errors discussed below. Even starting with your heels ridiculously close, like only an inch away from the wall, will benefit some people by allowing you to feel what it’s like to unlock your hips (the initiation of the WHHP) while maintaining good body position. It’s never wrong to move closer! And it’s never wrong to stay at a certain distance from the wall longer than you think you should.
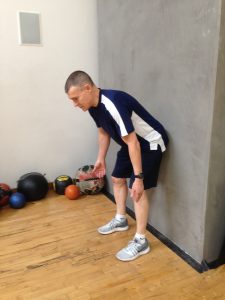
KNEES MOVING FORWARD ERROR
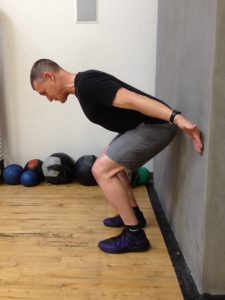
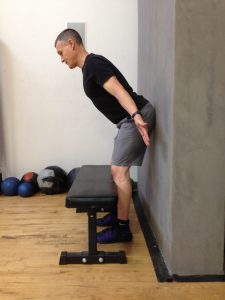
To correct for your knees moving forward during the WHHP, place a solid barrier like a bench or chairs in front of your knees/shins in the start/finish position (see photo on right). The barrier will gently coax your body to find another way to perform the pattern without your knees thrusting forward. Initially, move your heels closer to the wall – as close as 2-3 inches – and then inch away when your knees stop bumping into the bench or chairs. You should leave the barrier in place until this pattern of hip dominant movement becomes automatic and instinctual. Please don’t rush this fix! Your lower leg remaining perpendicular to the ground to express hip dominant movement is the most important concept to master in the WHHP.
KNEES MOVING TOGETHER ERROR
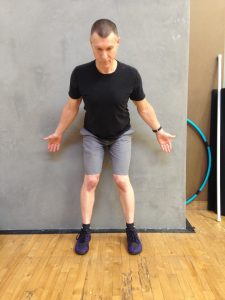
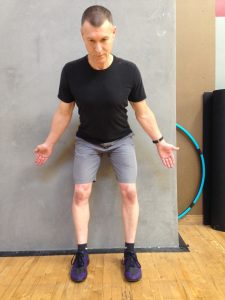
Look again at the headline photo and notice the woman’s knees – besides thrusting forward they are also moving inward and together – called a valgus knee collapse. Valgus collapse is an extremely common knee injury mechanism – especially for women and girls – so it’s really important to try to correct or improve this movement error.
To correct for your knees moving inward and together during the WHHP, your first step is to review, practice and master Point 1 Action from my earlier post, the 7-Point Alignment Exercise. Second, move your starting heel position closer to the wall – no more than 2-3 inches – and as you initiate the hip hinge really concentrate on pushing your knees apart laterally while keeping your feet flat on the floor. Use a mirror or ask someone to verify your knees are tracking vertically in-line with your feet as viewed from the front (see photo on right). Next, take as long as you need to groove this very small range of motion WHHP with your knees in line with your feet. Finally, move your heels away from the wall very slightly and re-verify your knee position relative to your feet. Each time you inch away from the wall to progress, consider it like a new exercise and re-verify your knee position.
UPPER BACK ROUNDING AND/OR SHOULDERS SLUMPING ERROR
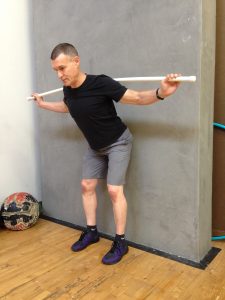
See Primary Error Number 1 above: Focus on improving Point 5 & Point 6 Actions of the 7-Point Alignment Exercise to improve your upper back and shoulder position. For Point 6 Action focus only on pulling your shoulder blades together since during the WHHP your arms are not in contact with the wall.
If improving your 7-Point Alignment Exercise doesn’t improve your position enough, first move your heels closer to the wall. Next – if you have enough shoulder range of motion (ROM) to do it comfortably – place a light pole horizontally behind your shoulder blades (see photo on right). Be sure the pole is not resting on top of your shoulders – your body should block your view of the pole at shoulder level if it’s in the right place. Also, to use this fix properly, you need enough shoulder ROM to allow your elbows to point down toward the ground in the start/finish position, not back toward the wall. Finally, this fix is a postural challenge, so it’s really important to move closer to the wall before you try it.
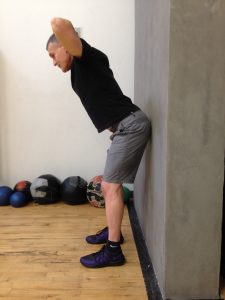
FALLING/LEANING AGAINST THE WALL ERROR
First, as with all the previous fixes, move your heels closer to the wall and retry the pattern. This one adjustment often takes care of the problem. Spend time grooving the pattern with your heels closer to the wall before you attempt to inch further away.
Next, re-evaluate your visual focus – you should be looking down at a spot about three feet in front of your toes. If you are falling or leaning against the wall, you are not staying balanced on your feet, and a common reason is not hinging enough at your hips. “Hinging at your hips” implies the front of your trunk (upper body) and thighs are coming closer together. Maintaining a visual focus too high and too far away encourages your upper body to stay too upright and makes it hard to hip hinge.
Finally, re-evaluate your weight distribution between the front and back of your feet. Placing too much weight into your heels will sometimes cause a loss of balance and a fall against the wall. Your weight should remain more evenly distributed between the front and back of your feet while in the mid- point position.
WHHP PROGRESSION: THE PRISONER POSITION
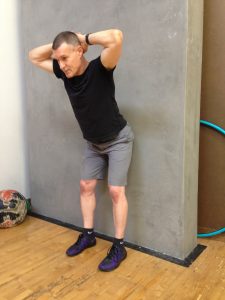
So you’ve already applied the first progression, which is gradually moving your heels away from the wall until they are about a foot-length away, and you have flawless technique and your WHHP is automatic, consistently reproducible and instinctual. What next?
First, congrats on taking a positive step to improve your fundamental movement skills! The next way to progress is to add a postural challenge like interlacing your fingers behind your head with elbows apart – the so-called Prisoner Position. Before you attempt the Prisoner Position WHHP, move your heels back closer to the wall – no more than the original 3-4 inches away.
The main precaution with the Prisoner Position is to make sure your new hand/arm position doesn’t cause a change to your head/neck position. This can happen; and particularly so if you lack shoulder ROM. Before you try a Prisoner Position WHHP, it’s a good idea to practice the Prisoner Position standing with your back against a wall – this allows you to determine if it’s a doable and comfortable position for you. If it’s uncomfortable or you find your chin on your chest or your elbows can’t spread apart and get close to the wall, it’s not appropriate for you right now. However, you can try to work on mobilizing your shoulders to a better Prisoner Position.
To gently mobilize to a better Prisoner Position, lie face-up on a solid surface with your knees bent and place your hands/arms in the Prisoner Position. Next, just let gravity pull your arms/elbows closer to the surface you are lying on. Once that’s comfortable, actively (but not too vigorously) try to move your elbows closer to the surface you’re lying on – start with 5-10 second long efforts and repeat several times. Respect pain and discontinue if it’s more than mildly uncomfortable – there’s a reason for the pain and you should get it checked out medically.
NEXT POST
Next post I’ll cover a version of the WHHP which advances functional fitness appreciably as it entails placing much of your body weight on one leg. I call it the Split Position or Kick-Stand WHHP. It can be a challenging step up from the standard WHHP and is not for everyone. For example, if you have significant issues with lower body strength or balance this progression may not be appropriate for you right now.
Related Posts